Best Braised Dried Oysters and Mushrooms with Fatt Choy
Best Braised Dried Oysters and Mushrooms with Fatt Choy
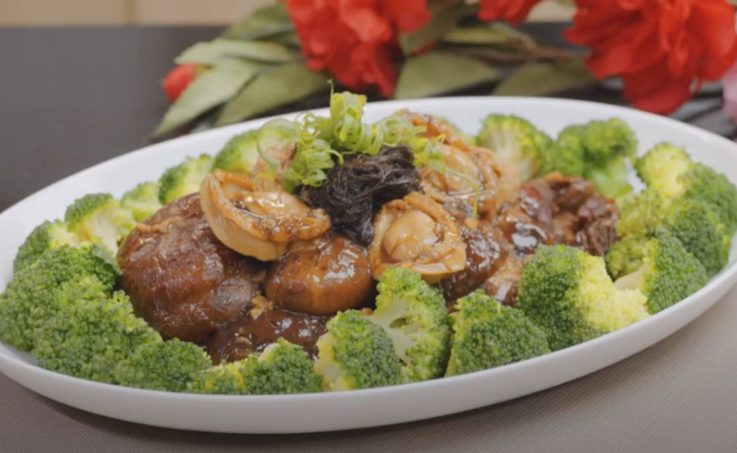
This is quite possibly one of the most well known Chinese New Year’s dishes! In this conventional dish, abalone and the mushrooms are braised and afterwards covered with a fatt choy. The name of the dish itself has an auspicious meaning of cheerful occasions and flourishing.
Here’s how to make best braised dried oysters and mushrooms with fatt choy
Ingredients
- 10 g fatt choy
- 1 can abalone (dried)
- 12 dried oysters
- 20 g rock sugar
- 1 tsp garlic (minced)
- 1 tsp minced ginger
- 750ml water
- 250 g broccoli (cut into florets)
- 12 dried shiitake mushrooms (soaked to soften)
- Scallop abalone sauce
- A little dark soy sauce for colour
- 4 tbsp oyster sauce
Steps to make Best Braised Dried Oysters and Mushrooms with Fatt Choy
- Put the soaked mushroom with potato starch. Squeeze them together. The potato starch will help to remove any impurities. Once done, bring it to the sink to wash the starch away.
- Cut the stalk of the mushroom and set it aside.
- Put water into the La gourmet pressure cooker and let it boil.
- Once boiled, add all the broccoli and a pinch of salt, sugar and oil. Dish it out when done.
- Add sesame oil. Saute the garlic and ginger.
- Add in the dried oysters and continue to stir fry.
- Put the mushrooms in and add a bit of water to braise them.
- Put in all the seasoning – oyster sauce, dark soy sauce, chicken stock, rock sugar and cooking wine.
- Close the pressure cooker and let it cook for 15 minutes.
- Dish out the ingredients once done. Place the broccoli florets around the plate and the mushrooms in the centre.
- Next, put the juice of the abalone and a bit of water into the pot. Let it boil.
- Make a corn starch slurry on the side to get ready.
- Add in abalone after the sauce boils. Give it a quick stir and dish out.
- Put the fatt choy into the pot and let it boil for a while.
- Put the abalone on top of the mushrooms and fatt choy on top.
You may be interested in these auspicious dishes as well!
Aromatic salty prawn
Deep fried fish
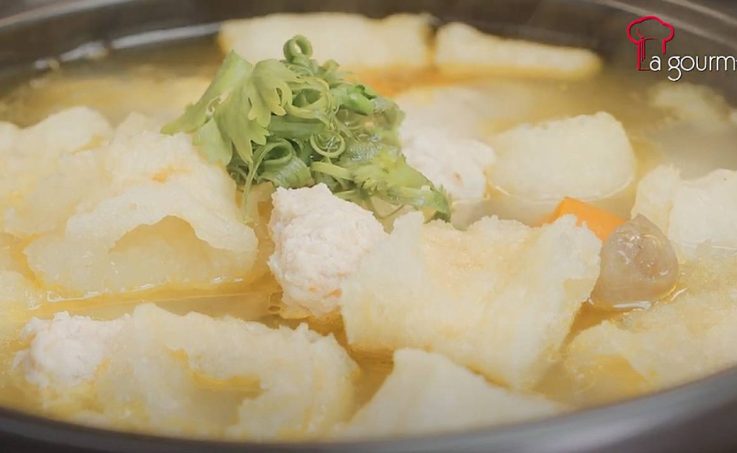
Fish maw soup
Why do we need to soak the mushrooms?
Other than the abalone, the mushroom is the co-star to this best braised dried oysters and mushrooms with fatt choy dish. Chinese dried mushrooms (likewise called dark mushrooms or dried shiitake mushrooms) have an extremely substantial flavour that upgrades the kind of soups, sautés, and braised dishes. Be that as it may, the dried mushrooms should initially be rehydrated. This is a common step regardless of whether you’re wanting to throw them in a soup or stock. Other than giving them a plumper surface, soaking the dried mushrooms helps eliminate any particles of soil.
Cold water is certainly the most ideal way to rehydrate dried shiitake mushrooms as it assists the mushrooms in retaining all their flavour.
The fluid from soaking the dried mushrooms can be utilized to upgrade the kind of soup or braising fluid or it very well may be added to sautéing vegetables to keep them from drying out. It additionally makes an extraordinary veggie lover/vegetarian cordial substitute for chicken stock in plans. Strain the water properly before use.
Furthermore, don’t toss out the cut mushroom stems; they are an extraordinary method for adding additional flavour to a soup. Simply seal in a plastic sack and freeze until required.
How would you clean the Fatt Choy prior to cooking?
Put the fatt choy in cold water and let it soak for 15 minutes. Wash it around a piece to wash off any soil or particles. Take out the fatt choy and dispose of the water. Repeat the soaking process again until it is clean. Drain it in a colander to remove all the water.
Hope you enjoy this Best Braised Dried Oysters and Mushrooms with Fatt Choy from us!
For more amazing cookware promotions, drop by our website!
Deep Fried Fish with An Excellent Sauce
Deep Fried Fish with An Excellent Sauce
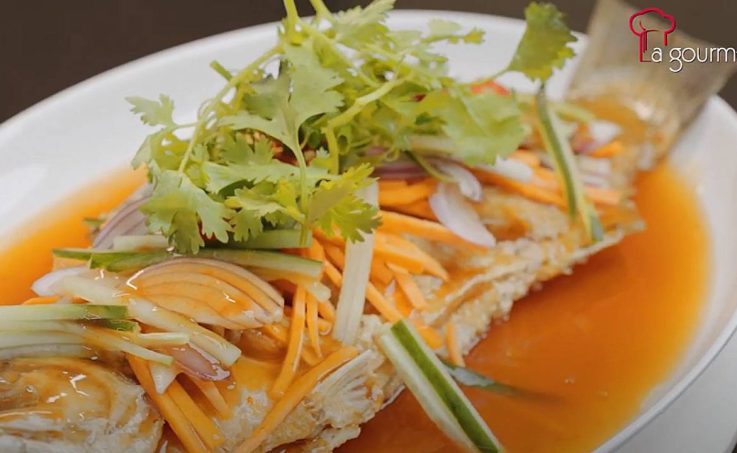
Deep fried fish is a dish normally enjoyed by Chinese families. Like steamed fish, it’s easy to make! By and large, I’ve observed that the determination and accessibility of fish play a major element in the sort of dish that is ready.
Fish during dinner for the Lunar New Year is an essential traditional practice for guaranteeing a solid and prosperous year. This is on the grounds that “fish,” articulated in any Chinese word, seems like the word for overflow. Families generally make two fish for the Spring celebration dinner, serving one and leaving one in one piece for the following day to represent the overflow that will come in the new year.
This amazing recipe works with any sort of firm white entire fish. The ideal length for the fish is about the size of a major supper plate. This is one fish supper dish that will definitely expand your hunger as it is fresh, substantial, crunchy and just somewhat hot. It’s simply wonderful served close by a fish excellent dipping sauce.
Ingredients
- 850 – 900 g barramundi clean and gutted
- 1 tbsp ginger juice
- 2 stalks of spring onions
- Coriander leaves
- Spring onion curls
- 50 g carrot shredded
- 50 g onion shredded
- 60 g Japanese cucumber shredded
- 1 tbsp red chilli
- 1 tbsp rice vinegar
- 2 tbsp tomato sauce
- 1 tbsp fish sauce
- 1 tbsp plum sauce
- Adequate cornflour slurry thickening
- 350 ml water
- 1 tbsp salt
- ½ chicken stock powder
- ½ tsp pepper
- 3 tbsp sugar
Steps for this deep fried fish
- Heat up the oil in the frying wok. To test if the wok is hot enough, splash some water into the wok. If the water droplets start to bubble, this means that the wok is hot and ready!
- Add in the oil when the cast iron wok is hot enough.
- Make some slits on the sides of the fish. This part will turn out to be crispy when it’s fried. Other than that, dab and gently rub the fish with spring onions and ginger. This will remove the fishy smell.
- Take a kitchen towel and gently pat dry the fish.
- Next, season the fish with salt and pepper. This will enhance the flavour of the fish when it is deep-fried.
- Gently put the fish into the hot oil. Use the ladle to scoop the hot oil and pour it on top of the fish.
- Dish out the fish from the oil.
- Prepare the excellent sauce by preparing a bowl of 350ml water and mix in the chilli sauce, tomato sauce, fish sauce, plum sauce, brown sugar and rice vinegar.
- Then add the mixture into the hot pan.
- While cooking, put in corn starch water and keep on stirring. Add a dash of wine if you like.
- Pour the sauce over the fish once done.
- Put the shredded carrot, coriander and onion as garnish. Serve and enjoy!
How to choose fresh fish for the fried fish recipe?
It’s a well-known fact that Malaysians love to fish. On exceptional events, particularly during the Chinese New Year, they are many times filled in as an image of thriving and best of luck. Genuinely, a Malaysian festive celebration wouldn’t be complete without a deep fried fish dish.
We all know what to pay special attention to while looking for our fish. This section will share certain tips on the most proficient method to choose the freshest fish in the market to ensure you just get the best quality primary element for your recipe the following time you shop:
- Look at the eyes
The speediest method for telling on the off chance that a fish is fresh or not is through its eyes. They ought to be splendid, clear, and stout as though the fishes are brimming with life. On the off chance that the eyes look indented and cloudy, it should be an indication that the fish has been there for a really long time.
- Check out the gills
A new fish has spotless and radiant red gills. Assuming the gills are vile and have gone to a dim brown or dark, it is an obvious sign that the fish is as of now no longer fresh.
- Smell the fish
Does the fish smell spotless and fresh, or does it emit a foul scent? A decent fish should smell briny like it is new off the ocean. In any case, on the off chance that you’ve identified any uncommon aroma, the fish has most likely begun to spoil.
- Examine the scales
A sparkling, metallic scale is a decent sign that the fish is a decent catch. In any case, to sincerely test its freshness, you should run off your mind through its scales and notice in the event that they handily fall off. In the event that the scales are not generally so firm as it ought to be, you should search for another fish.
Hope these tips are useful for you in getting the best dish for this deep fried fish recipe!
If you like seafood, you may also like these recipes:
Fish maw soup
Thai steam fish
Salty prawn
For more exciting best cookware offers, check out our website!
Aromatic Salty Prawn Recipe
Aromatic Salty Prawn Recipe
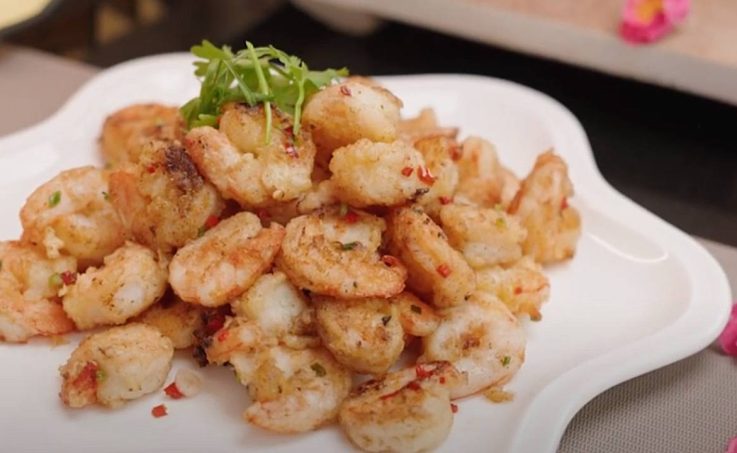
Searching for a rich deep-fried prawn recipe? Then check out this straightforward yet delightful hors d’oeuvre made with the decency of prawns. In the event that prawns are your number one seafood, you will adore this appetizer recipe. The brilliant broiled prawn recipe is a tasty and fresh nibble with a crunchy and flavoursome coating to make it fascinating. You can create an assortment of tidbits and sauces with prawns which can be filled in as a fundamental dish or close by broiled rice. The fixings used to set up this dish can be effortlessly found in your kitchen.
Prawns get their particular pink or red tone on being cooked. The most amazing aspect of cooking this recipe at home is that you can really take a look at the nature of the ingredients and furthermore guarantee that the prawns are cleaned and deveined appropriately. This is on the grounds that prawns veins can cause food sensitivities. Along these lines, in the event that you are longing for a few fresh broiled prawns, attempting it at home and the solace of the home is ideal. Cook up this recipe for any exceptional events, for example, kitty party, game evening, commemoration or birthday events. Cook these tasty deep-fried prawns by following the simple tasks and present them with ketchup. Partake in the crunchy prawns with your friends and family.
Here’s how to make this prawn recipe:
Ingredients
- 1 egg (lightly beaten)
- 500 g shelled medium-large prawns
- 2 tbsp cornflour
- Adequate Shaoxing wine
- 1 tsp salt
- 2 ½ tsp chicken stock powder
- 1 tbsp sugar
- 1 egg white
- Adequate sesame oil
- ¼ tsp 5 spice powder
- ½ tbsp sugar
- ½ tsp pepper
- ½ tsp salt
- ½ tsp chicken stock powder
- ½ piece of red chilli (seeded and diced)
- 1 tbsp chopped spring onion
- 2 -3 tbsp canola oil
Steps for this prawn recipe
- Start by marinating the prawns. Put sugar, salt and chicken stock. Stir them together with a pair of chopsticks.
- Pour the egg white into the mix and stir.
- Add in sesame oil then mix well to combine. Set aside once done.
- Beat the egg yolk on the side.
- Prepare a bowl of cornflour on a side as well.
- For every prawn, dip it into the bowl of beaten egg yolk first then into the corn starch.
- Heat up the wok. You can test if the wok is hot enough by splashing some water into the wok. If the water droplets start to bubble, this means that the wok is hot enough.
- Pour the cooking oil in.
- Gradually add in the prawn.
- Scoop the prawns up with a skimmer and put them on a plate with a sheet of kitchen towel underneath to absorb the oil.
- Put the canola oil into the wok.
- Put the spring onions and red chillies. Stir fry.
- Put the salt, sugar, pepper, and 5 spice powder and stir them around.
- Pour the prawns in and mix well. Add the Shaoxing wine and watch the wok hei.
These prawns are an amazing addition to your auspicious dinner with loved ones. Don’t forget to include boxing chicken as well as these savory little bites will sure light up the gathering! Finish off with a delicious bowl of orh nee dessert for that perfect ending.
The Easiest Way To Devein A Prawn With The Shell On
It’s no simple task eliminating the long queue of waste along the prawn’s back with a blade, fortunately, there’s a simpler strategy.
Procedure
- Take your toothpick and slide it right between two bits of shell and under the vein.
- Hold the prawn in a topsy turvy U-shape with your toothpick squarely in the middle, and lift the toothpick gradually.
- The vein ought to emerge alongside it, so you can pull it out with your fingers.
Tips on buying fresh prawns for this prawn recipe
- Purchase frozen prawns
Obviously, while purchasing fish, you’re searching for freshness. I would agree that except if you have an exceptionally trustworthy fishmonger or fish stall that sources fresh, never-frozen prawns, purchase prawns from the frozen part of your supermarket! Continuously take a look at marks for any added preservatives or additives- “prawn” ought to be the main ingredient.
While it might sound contradicting, frozen prawns at most of the time fresher than the prawns you see spread out on the ice at the fish counter. That is on the grounds that they are streak frozen once, and by and large stay frozen until they hit general stores.
What you’re hoping to stay away from is a prawn that has been defrosted and sitting out for quite a long time or a prawn that has been refrozen and defrosted on various occasions. At last, it’s difficult to tell how long the prawn at the fish counter has been out, and it’s significantly more earnestly to know how often it’s been frozen and defrosted.
- Pick prawns with shells and deshell them yourselves
There are a bewildering number of choices with regards to choosing prawns. You can get them with the shells on, or prawns that have proactively been deshelled and de-veined.
I like to purchase prawns that are still in the shell, however with the heads removed. The special case would be assuming you’re cooking conventional dishes that require entire prawn with the head still on.
- Before choosing prawn size, think of the dishes that you will be making.
Prawns differ broadly in size- – even cultivated prawns. You might have seen various numbers on the bundles of prawns at the supermarket – like 16/20, 21/25, or 31/35. These numbers are known as the “count,” which is the number of prawns per pound. The lower the numbers, the greater the prawn. The higher the numbers, the smaller the size of the prawn.
While picking a size, think about the thing dish you’ll make. A few dishes require huge prawns, while some are more adaptable. A formula will typically show what size prawns are required. Actually, look at those proposals, however, a definitive choice is yours!
Something else to note is whether the prawn will be cooked with the shell on or off. At the point when we cook prawn plans with the shell on, we like to pick prawns with more slender shells, keeping away from assortments with thicker shells like tiger prawns.
More tips on how to buy the best prawns for your prawn recipe
We strongly implore you to keep away from prawn that has been defrosted and conceivably sitting out for a day or more. Purchase from a bustling shop, and inquire as to whether the shrimp were defrosted that day, how long they have been out, and assuming they have at any point been refrozen.
Wild-caught prawns may sound tempting and are for the most part more delightful, however, be reminded that wild shrimp can have a thicker black vein that should be totally taken out. If all else fails, get additional info from your seller.
Prawns ought to have a firm sensation to their flesh. Stay away from prawns that vibe delicate or even soft to the touch and never purchase shrimp assuming you smell any clue on alkali, and that implies they have proactively begun to rot.
Purchase from a trusted source! It’s ideal to purchase from a fish market that you know, where you often shop. They would be able to recognize you as a returning customer and hence will give you the best advice and deals from time to time.
Are these tips useful? Share it!
For more quality cookware, check out our website. We always have cool offers for you!
Lucky Bag Dumpling (Fook Doi) Recipe
Lucky Bag Dumpling (Fook Doi) Recipe
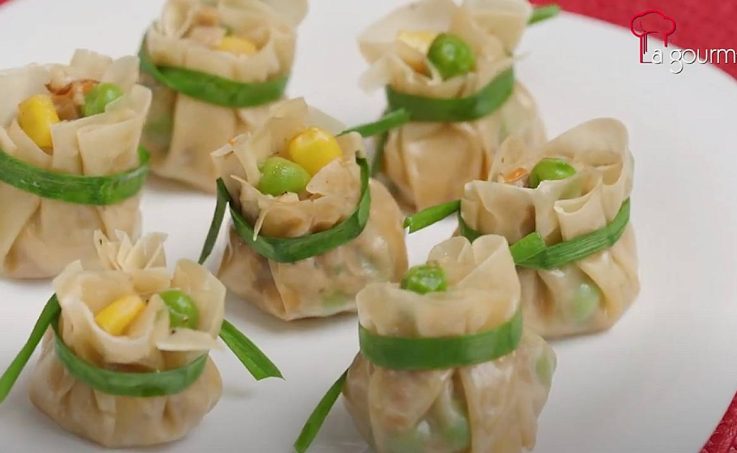
Lucky bag dumplings are inspired by the well known Chinese New Year food – cash sack that is being used back in the olden days.
During Lunar New Year/Chinese New Year or any festivals, the Chinese love to serve food that has unique significance as a method for sending good wishes to family or ourselves. Lucky bag dumpling is one of the dishes to make to wish the exact thing the name says – fortune. The pocket-like shape seems to be the cash pack well used in old times to represent prosperity and good fortune.
Ingredients
- 100 g deboned chicken meat (finely diced)
- 1 tbsp sesame oil
- some round wonton skin
- 1 tsp chopped garlic
- 1 tbsp chopped spring onion
- 50 g diced carrot
- 30 g corn kernels
- 30 g green peas
- 5 canned button mushrooms (diced)
- 30 g corn kernels
- 30 g green peas
- spring onion
- some ground black pepper
- 1 tsp scallop abalone sauce
- 1/2 tsp sugar
- adequate chicken stock
- some pepper
- 1/2 tsp salt
Steps to make lucky bag dumpling:
- Firstly, season the diced chicken with sesame oil, chicken stock and pepper, mix well.
- After that, add sugar, salt and corn starch. Combine well. You can use a chopstick to mix it around until the chicken meat is all well coated.
- Heat up the wok.
- Add some sesame oil and garlic, chopped spring onion and fry until fragrant.
- Now, add in the marinated chicken. Stir fry.
- Add in the diced button mushroom, finely diced carrot and some water.
- Enhance the taste further by adding a pinch of ground black pepper, chicken stock, salt and some sugar.
- Then, add in the scallop, abalone sauce and some water. Continue to stir well.
- Add in the green peas, and fresh corn kernels and stir well.
- Next, we’re gonna wrap the wonton skin. Use about 3 to 4 pieces of wonton skin and press the edges with a pair of chopsticks to flatten it.
- Scoop some filling onto the centre of the wanton skin then position and shape it as you would when wrapping a siew mai.
- Take out a piece of chives and wrap it around it. Tie it loosely with a strand of chive.
- Once you’re done with the wrapping, it’s time to steam it in the steamer for about 10 minutes.
- The lucky bag dumplings are ready to serve.
These lucky bag dumplings makes amazing party snacks to be accompanied with other finger food as well such as egg popiah and satay ayam.
Tips to make the best lucky bag dumplings
Dumplings are genuinely a wonderful source of both blessing and pain to make, and keeping in mind that you can appreciate them any season, they’re particularly significant at Lunar New Year, a chance to consider customs while getting a charge out of celebratory dishes with friends and family. They address success due to their full shape. The more filling in your dumpling, the greater your wallet will turn into.
Remember to season your dumpling fillings
Right before you start, you should always remember to season your filling and taste it prior to making a lot of them. If not you may be frustrated by an absence of flavour, which nobody needs after all the work of wrapping dumplings. The most ideal way to taste your flavouring is to cook a loaded teaspoon in a pan and test it. This way you know whether you really want somewhat more either. Dumplings won’t be that enjoyable without their dipping sauce, so be certain not to salt it way too much. When you get the seasoning at your preferred level, then, you are ready to start wrapping up your filling with the wonton skin.
Keep it chilled in the fridge
This may be subjective to individual preference, however, I like to cool my filling prior to wrapping. Why? The filling has a fat part, this is the very thing that makes them delicious and rich when fried up. Whenever fat is warmed up, it will soften and leak out. By cooling the filling, the fat won’t go to fluid as fast and you can ensure that the juicy bites are there when you make this dish. Less fluid likewise implies the dumplings are simpler to deal with and the wonton skin won’t tear and become wet.
Try not to overstuff your dumpling fillings!
On the off chance that your dumpling was to symbolise your wallet, you would need to stuff it as far as possible. Yet, don’t fall for it! It will be a pending disaster while cooking. Never fill more than two-thirds of the wonton skin. The filling ought not to be popping out of the pleats and seal.
Go for a nonstick pan or wok
Nonstick skillet is your closest companion when you need to accomplish a firm crunchy skin, and assuming you’re feeling extra merry, a dumpling skirt. Ensure you have a sufficiently huge skillet with the goal that the dumplings don’t overlap each other.
Freeze your dumplings
Dumplings are an incredible make-ahead food. In the wake of filling every one of them, you can without additional effort, freeze them and cook them from frozen. The secret to freezing dumplings is to lay them on a sheet plate in a separate layer, permit them to freeze, and afterwards place them into a sack. Assuming you heap them on top of one another in the pack before they’re frozen, that is the way they will freeze — as a chunk of dumplings. Then when you need to take a few for cooking, it’s highly likely that you may accidentally tear them apart.
For more choices of quality cookware to accompany your cooking journeys, check out our website for fantastic promotions!
Dual Flavored Boxing Chicken Recipe – You Won’t Eat Drumettes The Same Way Again
Dual Flavored Boxing Chicken
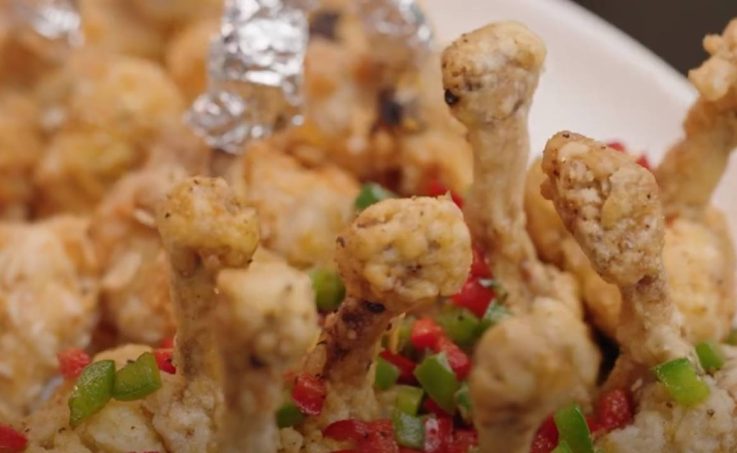
Boxing chicken was a thing back in my hometown during the 80s. It was an intriguing dish to be served at dinner time on account of its shape which looks like a boxer’s fist. Covered with squashed cornflakes, this dish comes loaded with an awesome crunch making it the ideal nibble for social gatherings.
Boxing Chicken is a typical finger food served at mixed drink parties or get together in Malaysia. It is fundamentally chicken wings with the meat drove over the bone up to the finish to frame a ‘boxing glove’ hence the name.
Attempt to put your own signature of the dish by experimenting with the marinade a bit. There you go another heavenly and alluring starter or finger food that is easy to plan and simple on your wallet! You can also try out with Thai sauce, cheese and more!
In this recipe we will be creating two flavors of boxing chicken.
Ingredients
- 8 pieces Chicken Wings (divide into sections)
Marinade A
- 1 Egg
- ½ tsp Salt
- ½ tsp Pepper
- 1 tsp Chicken Stock powder
- 3 tbsp Corn Flour
- 3 tbsp Plain Flour
Batter B
- 50g Breadcrumbs
- 50g Oats
- 50g Cornflakes (lightly crushed)
- 3 cups cooking oil for deep frying
Dipping Sauce (Optional)
- 1 tbsp Wasabi
- 1 tsp Mustard sauce
- 1 tbsp Chilli Sauce
Combine all ingredients together, and stir well. Sprinkle over with a dash of pepper and ground black pepper.
Directions:
- Cut chicken wings (lower part) neatly to form into boxing shape.
- Break in an egg and add the rest of ingredients A to mix well.
- Coat marinated chicken boxing pieces with batter B.
- Deep fry in hot oil in Nitrigan Cast Iron Wok until almost cooked through. Dish out.
- Reheat oil and fry again for the second time until golden and crispy.
- Dish out and set aside. Wrap the end with aluminium foil to make eating less messy.
- Serve with dipping sauce.
Ingredients
- 8 pieces Chicken Wings (divide into sections)
- 1 tsp Salt
- ½ tsp 5-spice Powder
- 2 tbsp Shaoxing wine
- 4 eggs (lightly beaten)
- 1 cup Potato Starch
Seasoning
- 25g butter
- 2 tbsp each diced Red & Green Capsicum
- A dash of Shaoxing wine
- A dash of pepper & salt to taste
Methods:
- Put prepared chicken boxing pieces in a bowl. Add in salt, 5-spice powder and shao xing wine. Set aside for at least 30 minutes or preferably marinate overnight for better taste. Shaoxing wine, likewise called “yellow wine”, is a customary Chinese wine made by maturing glutinous rice, water and wheat-based yeast. It should be created in Shaoxing, in the Zhejiang territory of eastern China. It is broadly utilized as both a refreshment and a cooking wine in Chinese food.
- Dip marinated chicken boxing into egg mixture then coat with potato starch. Shake off excess starch powder.
- Deep fry in hot oil for 2 times till golden and crispy. Dish out and set aside.
- Heat Nitrigan Cast Iron Deep Frypan with butter to melt. Add in capsicum and stir well. Put in chicken boxing pieces then add a dash of pepper and salt. Toss well the boxing chicken and plate.
The lovely thing about this dish is that you can create a variety of flavors to it. Don’t feel shy to tinker with this recipe!
To make more fantastic dishes with quality cookware, visit our website and check out our offers!
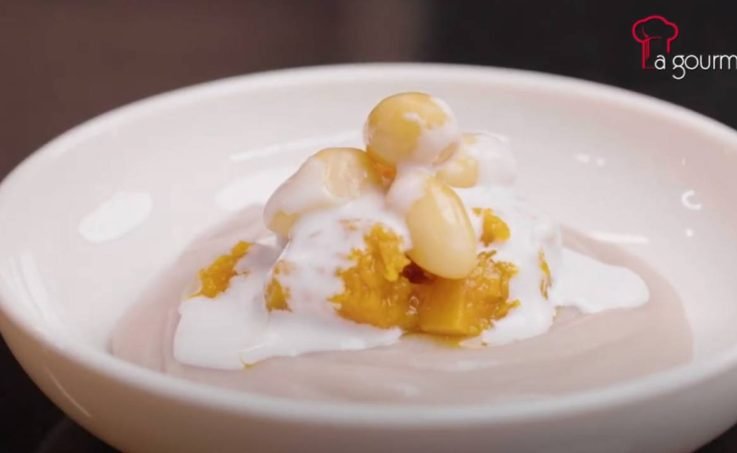
Orh Nee (Yam Paste with Pumpkin Puree and Gingko Nuts)
Orh Nee (Yam Paste with Pumpkin Puree and Gingko Nuts)
Orh Nee, a most loved Teochew treat is a yam paste that works out great for steamed pumpkin puree and boiled ginkgo nuts in syrup. Those that you purchase from eateries are either excessively sweet or excessively slick or both. This recipe is a better form as it utilizes no oil. The sweetness can be acclimated to one’s inclination as well.
The preparation steps of yam paste are extremely basic, however, what comprised a decent bowl of sweet potato glue is the nature of sugar and oils utilized. Customarily, yam paste was arranged utilizing fat. Obviously, other than oil and sugar, the nature of yam is additionally vital.
For the most part, in Singapore’s and Malaysia’s cafés, Orh Nee was served either in a thick paste form or smooth creamy texture. They are basically something similar aside from the difference in their texture. You can also add coconut milk to reduce its thickness.
Ingredients:
- 150 g ginkgo nuts
- 200ml thick coconut milk
- 1/2 tsp salt
- 100 g soft brown sugar
- 2 – 3 screwpine leaves
Instructions:
- Steam the yam and pumpkin to soften them. It’s simpler to crush the yam while it is as yet hot from the steaming system. The hotness additionally assists with softening the sugar and ties everything together pleasantly. In the event that sugar syrup is added to the yam, do attempt to warm it first prior to utilizing it to forestall the yam paste from chilling off too quickly.
La gourmet pressure cooker has 2 tier steaming that allows you to steam both the yam and pumpkin at the same time. - Boil brown sugar, screwpine leaves and ginkgo nuts together. If you don’t want to go through the hardship of deshelling the ginkgo nuts, you can purchase the canned version instead. To be honest, they don’t taste much different.
- Cook the coconut cream with some salt.
- Blend the steamed yam with syrup to make it into a paste.
- Press the steamed pumpkin into a fine texture. You can use a fork to do it. Or better yet, a potato masher.
- Put the yam paste onto a plate with a pumpkin on top.
- Pour the coconut sauce on top. Serve!
For this recipe, pumpkin is added to give it some sweetness. This gives the dish a little bit of colouring as well that is distinct and catchy. To give the dish an additional scent, fried onion can be added. Rather than improving this pastry dish with water chestnut syrup, we can use brown sugar instead. Gingko nuts are an unquestionable requirement for this dish since they add an extremely yummy surface contrast to this treat. Originally, coconut cream is not a part of the recipe. But, you can add them too to give it more of a creamy taste.
How do you like this dessert? We’d love to hear from you.
Looking for cookware replacement? Check out our website as we constantly have great deals for you!
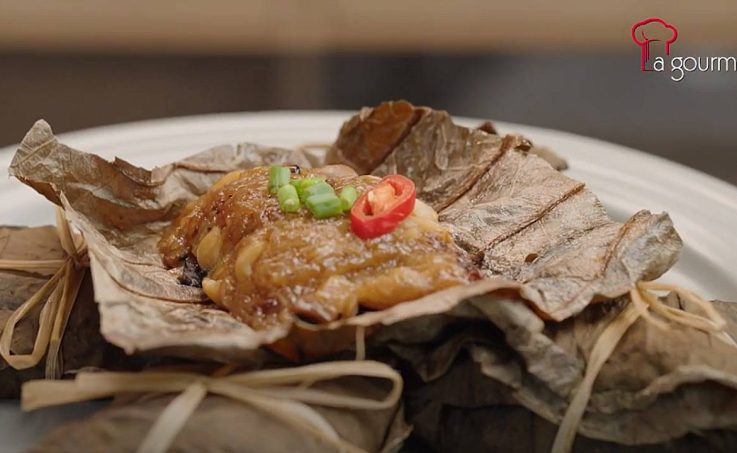
Best Glutinous Rice Wraps or Lo Mai Kai Recipe
This mouth-watering glutinous rice or lo mai kai will require quite some time to make. On the bright side, you can make a huge bunch of these wraps, steam them, and freeze them for some other time. Another tip: you don’t really need to utilize lotus leaves.
In the event that you can get them, most certainly use them. They add an intriguing flavour to the rice as it steams. In any case, we found that parchment paper additionally functions admirably for this.
Here’s how to make this glutinous rice wraps or lo mai kai:
Ingredients for this lo mai kai:
- dried hemp string
- dried lotus leaves
- 3 cups of glutinous rice
- 30 pcs dried lotus seeds
- 30 g dried oysters
- 5 dried shiitake mushroom
- 35 g dried prawns
- 3 cups water
- 1 tbsp sesame oil
- 3 tbsp oyster sauce
- 2 tbsp canola oil
- 1 tbsp dark soy sauce
- 2 tbsp light soy sauce
- 1 tsp pepper
- 1 tsp salt
- 1 tsp sugar
- 1 tsp chicken stock powder
Instructions to make lo mai kai:
- Fry the dried oyster and mushroom with the open-lid cooking function of the La gourmet pressure cooker.
- Put in the lotus seed, oyster sauce, light soy sauce, dark soy sauce, rice, chicken stock, sugar, salt, and pepper.
- Add in 3 cups of water. Stir. Let it cook for 12 minutes as set by the pressure cooker. This may differ from another brand of pressure cooker. La gourmet pressure cooker has fuzzy logic that automatically adjusts pressure and temperature.
- Wrap the cooked rice into the lotus leaf. Lo mai kai just wouldn’t be something similar without the lotus leaf. Besides the fact that it keeps it all intact, however, it adds that unobtrusive scent to the dish.
Lotus leaves are normally sold at Asian general stores or the wet market, and they should be soaked in water for an hour prior to being utilized to wrap up the rice. In the event that you don’t can’t observe lotus leaves, you actually can make this recipe utilizing parchment paper. Note that this won’t give it the traditional glutinous rice taste.
You can serve your glutinous rice wraps with a little bean stew oil or permit them to cool, place into cooler packs, and keep them up for some other time! At the point when you’re prepared to eat them, simply steam them right out of the cooler for around 30 minutes.
Lo mai kai are best when they are hot and right out of the liner. To eat, eliminate the string that is maintaining a level of control and cautiously open up the lotus leaf. They can likewise be eaten later in the day, and simply should be steamed, and they freeze well.
How to prepare the lotus leaves?
Here are the means to prepare the dried lotus leaves:
In the first place, fill an enormous bowl or any compartment sufficiently huge to fit the leaves with water.
Then, at that point, drench the dried lotus leaves until they rehydrate completely. It will require essentially 60 minutes.
From that point forward, heat a huge pot of water to the point of boiling. Blanch the leaves for five minutes or somewhat longer until they are softened completely. The leaves might break when you use them to wrap the rice on the off chance that they are still solid and unbending.
Eliminate them from the water, then clean them with a sodden material to clean it off any soil.
Cut back the abundance whenever required. I favour managing the leaves as per the size required prior to drenching and whitening them. This progression is useful in light of the fact that I don’t have an enormous holder to fit the untrimmed leaves.
Here is how to wrap your lo mai kai in lotus leaf:
Cut back the overabundance of the leaf prior to wrapping. The leaves are too large for one part except if you intend to make an enormous Lotus Leaf Rice wraps shared by a couple of individuals.
Place the leaf with the tip of the stem pointing down in a shallow bowl.
Arrange the lo mai kai at the base most piece of the leaf bundle. You can put the extra ingredients on the top as well. This is so that it remains on top considering that it will be turned overturned while serving.
Add the seared rice into the leaf and press to marginally pack it.
Overlap the leaf inwards like shutting an envelope.
Switch the wrap so the tip of the stem is confronting vertically.
Put the lo mai kai on a plate or liner crate, cover it if conceivable to stay away from water buildup from dropping onto the rice parcel while steaming.
Steam for twenty minutes over medium hotness.
Take out the lo mai gai from the steamer. Remove the highest point of the leaf to uncover the rice, then, at that point, embellish it with daintily cut scallion and red bean stew to serve.
Note: The motivation behind steaming the rice isn’t to cook it since it is as of now pan-seared. Steaming is intended to aroma the rice with the flavour and fragrance of the leaf. The fragrance of the lotus leaf will get more grounded assuming you steam it longer. It requires something like twenty minutes of steaming to get the rice imbued with lotus leaf smell and flavour.
The following are four methods for making this glutinous rice dish better for health.
- With a slight bend from the standard thing, add butternut squash shapes (or pumpkin) into the dish to add a characteristic touch of pleasantness to the appetizing flavours while additionally lighting up the dish for certain tones. Besides being a complex carb that can assist you with feeling more full while eating less rice, squash and pumpkin are loaded with nutrition and a natural source of antioxidants for better health.
- Low sodium chicken stock is utilized in this recipe to restrict the sodium consumption, decreasing the risk of hypertension and other medical conditions. Assuming you have additional time, you can make your own chicken stock by boiling chicken bones with water and a huge touch of salt.
- We can use chicken filets as a better yet rich wellspring of protein. To defeat the tacky surface of overcooked chicken bosoms, we added some corn flour to the chicken and diminished the cooking time.
- Glutinous rice has a chewier and starchier surface when contrasted with customary long-grain rice. With a normally better flavour profile, it gives a flavorful taste and nicer texture. Nonetheless, it is the most noteworthy the glycaemic file among all the rice types accessible on the lookout.
Hope these tips will help you craft the best lo mai kai!
For fantastic cookware deals, swing by our website!
Thai Steam Fish – An Auspicious & Healthy Dish
Thai Steam Fish – An Auspicious & Healthy Dish
Thai steam fish is a popular, straightforward dish frequently filled in as one of the last courses in a Chinese wedding dinner or during Chinese New Year for auspicious reasons.
Likewise, a dish can be found on home dinner tables on any old weeknight. That is the way you know it’s not simply simple… it’s truly delectable.
All you want is a couple of straightforward ingredients that can most likely currently be found in your own kitchen top and fridge.
You’ll get the hang of it rapidly as well. It’s a simple and flavorful method for preparing fish. Your family will love it! Here’s how to make this Thai steam fish recipe:
Ingredient
- 800g Grouper (gutted and cleaned)
Ingredients A
- 4 stalks Coriander Roots
- 4 – 5 Bird’s Eye Chillies
- 10 Cloves Garlic
Sauce B
- 7 – 8 tbsp. Fish Sauce
- 1 tsp. Chicken Powder
- 5 Limes (juice extracted)
- 3 – 4 tbsp. Sugar
Directions to make this Thai steam fish:
- Using the La gourmet Healthy glass food chopper, roughly chop ingredients A together.
- Next, mix the chopped concoction with the sauce B ingredients then set aside.
- Heat Elite wok with enough water, and bring to a rapid boil.
- Place the cleaned fish on a plate, put it on the steaming rack and steam the fish for 8 – 10 mins.
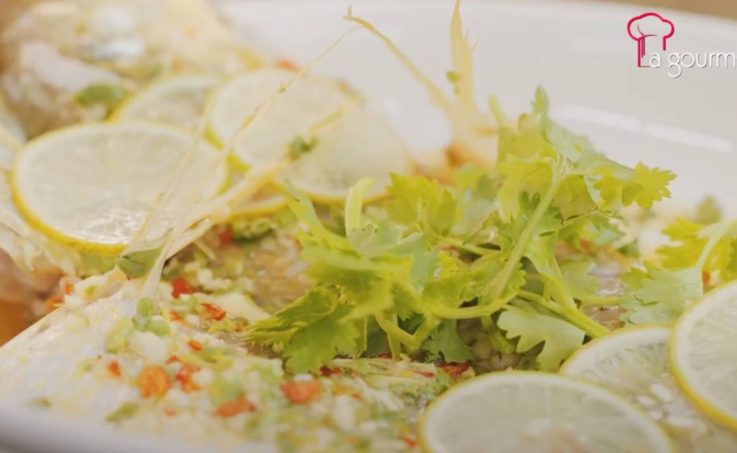
- Remove fish from the steamer, discard the steamed liquid, leaving only the fish on the plate and pour the combined lime chilli sauce.
- Garnish the Thai steam fish with extra coriander leaves.
What is the right fish that is perfect for steaming?
The Chinese love to steam entire fish, particularly the more seasoned age of people who consider the fish head and stomach the most awesome delicacies! In any case, getting ready, cooking, and serving entire fish has its difficulties, so many pick the more straightforward filet choice.
Picking the kind of fish filet to cook clearly relies upon accessibility and freshness, yet pretty much any common white fish is a decent decision.
Stay away from slick and firm fish like bluefish, mackerel or swordfish. Here’s a list of fish that is perfect to be used for this recipe:
- Fumble or accident
- Ocean bass
- Haddock
- Sea roost
- Grouper
- Cod
- Freshwater tilapia
How do I tell when my steamed fish is cooked?
Many sorts of fish are tender and delicate, so you need to try not to overcook them. The most effective way to let know if your fish is done is by trying it with a fork at a slanted angle, at the thickest point, and twist gently. The fish will come off effectively when it’s done and it will lose its clear or crude appearance.
How long do you need to steam the perfect fish?
Steaming fish can be done quite quickly particularly with the fish filets we’re utilizing in this recipe.
Likewise with any protein, bones expand cooking times, so it very well may be a piece trickier to decide when your fish is finished.
Indeed, even with fish filets, however, steaming time will in any case differ in view of the kind, size, and thickness of your filet.
For little, slender filets, your fish might cook in as brief period as 4-5 minutes. Thicker, bigger fillets will take more time.
It’s ideal to check the fish prior and continue to steam for an extra 1-2 minutes if necessary. Try not to overcook the fish, as it can get slightly hard or rubbery! Which is not a good sensation for eating.
How would you soften a hard fleshed fish?
The utilization of buttermilk is a compelling and delectable method for softening fish, which is hard to soften in any case by beating it with a mallet. The acids establishes in the buttermilk will separate the fish, making the completed item more delicate and delectable.
Is steamed fish a healthier option?
Thai steam fish is a low calorie protein recipe that fills the tummy for longer time without adding high fat substance. Steaming the fish assists it with holding its nutrients and minerals that you can lose while frying or grilling. It is additionally loaded with omega 3 unsaturated fats which radically helps with cardiovascular wellbeing.
For what reason is my fish flesh texture tough and rubbery?
Fish is quite possibly the most troublesome protein to cook. Whenever cooked excessively over long periods of time, it gets extreme and chewy quick. Regardless of whether sautéed appropriately, you may not yield the right surface because of it having been frozen.
What fish is typically used in Thai cooking?
In Thailand, small whole fish is utilized for their famous Thai steamed fish, so you might need to pick either a couple of rainbow trout (one for each individual) or an entire snapper. When the fish is cooked, it is dressed with a heavenly sauce of tamarind glue, garlic, galangal, coriander, fish sauce, and red bean stews.
How to steam the fish when you don’t have a steamer?
Steam In Water
To steam in water, fill a pot with 1/2 inch of water, add the fish or vegetables, cover, heat to the point of boiling, and cook until fresh delicate. Drain the water and put aside. This method functioned admirably for the broccoli, and would likewise be really great for other firm vegetables like cauliflower or carrots, yet the potatoes wound up tasting watery. What’s more, contrasted with different tests, it wasn’t the simplest or quickest choice.
Steam with Plate On Tinfoil
To steam your fish, simply fill a medium pot with 1/2 inch of water, place three golf ball-sized bundles of aluminum foil on the base, rest a hotness resistant plate on top of the foil balls, cover the pot, and heat the water to the point of boiling. Add fish and vegetables to the plate, cover, and steam until fresh delicate. Cautiously transfer the food from the plate and put away. The aluminum-foil-and-plate combo fundamentally turns into a DIY steamer that lifts the plate up above the water. This strategy is really basic and a nice alternative.
Check out our website for stunning cookware deals!
Fish Maw Soup – This Recipe Is Good For The Skin!
Fish Maw Soup – This Recipe Is Good For The Skin!
Fish maw is essentially dried fish bladder. However, try not to let that put you off! Fish maw or otherwise called hu pioh in Hokkien language, is an air bladder from huge fishes that adds to the capacity of a fish to drift in the water. In a few Asian societies, Fish maw is viewed as a food delicacy in light of its costly price. It is normally served braised, stewed or in soup. You can really purchase Fish Maw in dried or seared structure. The dried structure is well, hard and dry, though the broiled structure is all puffy and exceptionally light. Assuming you purchase the dried Fish Maw, you should drench them any more time until they are delicate
Growing up, Fish Maw Soup was a well-known sacred food for wonderfully energetic skin. Fish maw is known to be astoundingly rich in collagen, which assists with keeping the skin’s appearance brilliantly smooth. It’s likewise said to help with blood flow when consumed.
Fish maw doesn’t have a lot of taste of its own (somewhat boring as a matter of fact) and subsequently, it ingests the kinds of the fluid it is cooked in well indeed. To make any fish maw soup, all you really want is a decent stock and you’re set. Contingent upon the fixings you use, it tends to be straightforward and unattractive or extravagant.
Ingredients A
- 50g Dried Fish Maw
Ingredient B (Prawn Meat Balls)
- 80g Chicken Fillet Meat
- 80g shelled Prawns
- ½ tsp Pepper
- ½ tsp Chicken Stock powder
- ¼ tsp Caster Sugar
- ½ tsp Sesame Oil
- 1 tbsp Corn Flour
Ingredients C
- 1L Chicken Broth (Heinz)
- 5 – 6 pieces White Peppercorn (crushed)
- 5 Water Chestnuts (peeled and halved)
- 5 pieces canned Straw Mushroom (drained and halved)
Garnishing
- Some chopped spring onion and coriander
Directions to make this fish maw soup:
- Soak fried fish maw until softened, then blanch in boiling water briefly. Drain and set aside.
- Using the La gourmet Food Chopper, mince ingredients A. Dish out and make it into a ball. Set aside.
- Bring 1L water and chicken broth to a simmering in La gourmet Truly Oriental Claypot. Add in peppercorn and add water chestnuts (using inner pot thermal cooker).
- Drop-in prawn meatballs and cook until they float.
- Add in prepared fish maw and straw mushrooms. Bring to a simmering boil.
- Serve the fish maw soup with garnishing.
How do get ready fish maw prior to cooking it in the soup?
The fish maw needs to be soaked prior to cooking. The drenching time will shift contingent upon the kind of fish maw.
Premium fish maw:
– Soak fish maw in water for 12-18 hours until it softens up.
– Change the water occasionally and flush with cool water to get rid of its off-putting smell.
– Put ginger and shallot into a pot of new water and boil. Switch off the hotness after the water is boiled.
– Put the splashed fish maw into the pot and firmly covered with the top. Hold on until the water chills off.
– Take out the fish maw and wash with clean water then it is presently prepared for cooking.
– Soaked fish maw ought to be put away in the fridge at under 0℃ on the off chance that not cooked. Defrost each time prior to serving.
Fish maw tubes :
– Absorb fish maw new water for 6-12 hours until it relaxes.
– Change the water every once in a while and wash with cool water to take out its off-putting smell.
– Put ginger and shallot into a pot of new water and boil. Switch off the hotness after the water is boiled.
– Put the drenched fish maw into the pot and firmly covered with the top. Hold on until the water chills off.
– Take out the fish maw and wash with clean water then it is presently prepared for cooking.
– Drenched fish maw ought to be put away in the fridge at under 0℃ in the event that not cooked. Defrost each time prior to serving.
Why fish maw turns out to be meagre and gel subsequent to cooking?
Fish maw contains rich gel content which can effectively get liquefied in the event that the cooking time is too lengthy and the hotness is excessively solid. We ought to focus on the control of drenching and cooking time and the hotness temperatures. Abstain from involving high temp water for dousing or cooking with solid hotness to abbreviate the handling time. This will prompt the loss of fish maw’s gel content.
Is more seasoned fish maw or fish maw having delayed openness to sunlight is of higher quality?
There is a truism that the more established the fish maw, the better the quality. Truth be told, the length of capacity doesn’t influence the remedial worth of fish maw. Nonetheless, assuming the fish maw has been put away for quite a while and presented for a long time in daylight, its surface will become stiffer and its brilliant yellow variety turns hazier, which makes it look more interesting to the client. In addition, its totally dry body can give greater expandability subsequent to splashing.
How do you choose fish maw?
A decent quality fish maw ought to be thick yet looks clear when light sparkles through and doesn’t deteriorate into anything while at the same time cooking, it ought to be delicate and elusive. Fish maw from male fish can endure long bubbling times better while females become delicate and thick much faster. Dried fish maw is more grounded than the southern style kind and better for cooking feeding soups. The fish maw is not difficult to reconstitute, assimilates sauce effectively and gives an elastic surface to dishes.
Is fish maw healthy?
Fish maw is a decent wellspring of collagen, which is essential in solid skin excellence in all age gathering of one or the other orientation, for pregnant ladies, the skin of their infants. Collagen is equipped for saving fine composition and improving blood circulation.
Give this fish maw soup recipe a try and let us know how it goes.
Don’t forget to check out our website for irresistable promos!
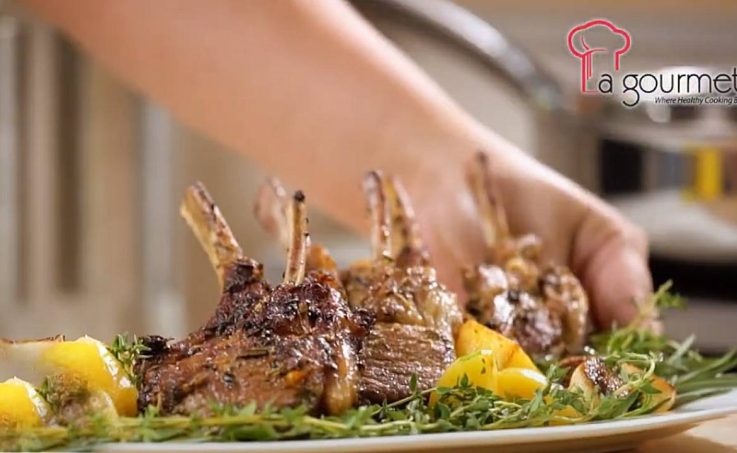
Tastiest Grilled Lamb Short Ribs using Honeycomb Wok
Tastiest Grilled lamb short ribs using Honeycomb Wok
Spring is most certainly the season for grilled lamb. If you’re like most people, you probably have an assumption that lamb has an excessively gamey flavour that is unpleasant for most. That’s what the actual truth is assuming the vast majority had a sample of a good, appropriately cooked grilled lamb, they would have changed their mind. I was one of those individuals that swore I wouldn’t generally care for grilled lamb until I had the most scrumptious, delicate and impeccably prepared grilled lamb in this recipe.
The significant thing about grilled lamb is that you need to know what ingredients boost its extraordinary flavour. Lamb is phenomenal when prepared with garlic, rosemary, thyme, oregano, exquisite, lemon, fennel, mustard and mint, just to give some examples. Assuming that you’re working with one or more of these flavours, you’re most certainly headed in the correct direction for an awesome meal.
Here’s how to make this fantastic grilled lamb dish:
Ingredients:
- 2 large garlic cloves (crushed)
- 1 tbsp fresh rosemary leaves
- 1 tbsp fresh thyme leaves
- Pinch cayenne pepper
- Coarse sea salt
- 2 tablespoons extra-virgin olive oil
- 6 lamb chops (about ¾ inch thick)
Steps:
- Add the garlic, rosemary, thyme, cayenne, and salt into La gourmet electric chopper and mix well.
- Pour the olive oil into the glass food chopper and pulse it into a paste.
- Rub the paste on both sides of the lamb chops and let them marinate for at least 1 hour in the fridge. If you can prepare this the night before, it’ll be better!
- Heat up the frying pan over high heat until it reaches the smoke point. Then, lower the flame to medium, add the lamb chops and sear for about 2 minutes.
Each cooking fat, be it margarine, fat, or oil, has a smoke point: a temperature at which it quits shining and starts conveying obvious smoke signals. Figuring out how to decipher those signs is an essential component of any great cook’s jargon.
- Flip the chops over and cook for another 3 minutes for medium-rare and 3 ½ minutes for medium. Transfer to a plate.
- Decorate with potatoes and greens. Serve while it’s hot.
What amount of time does it require to cook grilled lamb?
Assuming that you like your grilled lamb cooked to medium-interesting (as I do), you’ll barbecue them sufficiently long to get a decent burn outwardly and remain delicious inside. Barbecuing for 3 to 4 minutes for each side over medium-high hotness on a charcoal or gas bar-b-que is perfect. To check for the right inner temperature, a moment read thermometer or meat thermometer ought to peruse 58°C when embedded in the thickest part. Allow the grilled lamb to rest 5 minutes prior to serving.
Since all lamb chops are of various sizes, it is recommended that utilizing a thermometer is the most ideal way to get your lamb chop cooked to the temperature you like. 43°C for rare, 54°C for medium-rare and 65°C for medium.
What is the best seasoning to enhance the grilled lamb’s flavour?
Grilled lambs are so heavenly on their own that they don’t need long marinating times or even a lot of preparing, simply olive oil, salt and pepper will do. However, I suggest adding garlic and rosemary too for the manner in which they highlight the kind of sheep. Other new spices like Fresh thyme as well as oregano would likewise be flavorful! In the event that you like to add an explosion of newness not long prior to serving, a press of fresh lemon juice is one thing you can add as a cherry on top.
How to reduce the gamey smell of the lamb?
One incredible method for diminishing the gamey lamb smell is to veil it with flavours. Contingent upon your dish, you can utilize sweet or appetizing spices and flavours. Cinnamon, allspice, ginger and cloves are great decisions for sweet dishes. Use spices like rosemary, savvy, dark pepper and time for flavorful dishes. Garlic has a solid fragrance, while a hint of acidic lemon juice, frequently used to battle the smell of fish, can lessen the smell in sheep.
Utilizing a marinade, for example, teriyaki or a mix of soy, ginger and pineapple, will add some steam during the cooking system, yet will lessen the gamey flavour and fragrance. Lamb meat can be marinated for as long as five days prior to cooking as well.
How to store grilled lamb?
For wellbeing and quality, cooked lamb ought to be put away in a sealed shut compartment and kept in the refrigerator for no longer than 3-4 days.
Cooked lamb chops can be kept frozen, also. Prior to freezing, ensure your sheep chops have chilled.
Wrap your grilled lamb with two layers of cling wrap prior to putting them in an impermeable compartment. You can likewise vacuum seal them to keep the virus air from causing cooler consumption. Frozen grilled lamb will save a considerable length of time when you feel like eating it the soonest.
How to tenderize grilled lamb meat?
Utilizing a mallet
Practically any sort of meat can be beat to make more slender, compliment cuts which will cook quicker and all the more equally.
Albeit chicken bosoms don’t need softening, they can be beat and leveled to fold over fixings for example chicken bosom enveloped by rashers and loaded down with spinach and cheddar.
Beating the meat separates the protein strands, making them more limited which brings about a more slender and more delicate cut.
Braising
This method is utilized for harder cuts of meat which have some fat connected or marbled through it. It isn’t proper for lean cuts, as it will dry out the meat delivering it chewy.
As the fat melts, it bestows a lot of flavour to the dish and dampens the muscle filaments as they cook, keeping them from batching up firmly and drying out.
Braising includes cooking the meat completely lowered in a flavoursome fluid at a low temperature (someplace in the 60℃ – 80℃) for an extensive stretch of time (anything north of 2 hours).
The connective tissue mellows and the extreme collagen goes to gelatin, delivering delicious and delicate meat.
Check out our website for ongoing promos and offers.


